Springboot使用security登录
Springboot使用security登录
参考内容:
- Getting Started Securing a Web Application (spring.io)
- Spring Security教程(一) — 简单的登录认证 老亚瑟博客 (ffspace.cn)
- Spring Security教程(二) — 基于数据库信息进行验证 老亚瑟博客 (ffspace.cn)
如果以上链接失效,以下所有内容均可在springboot-demo中找到。
Spring Security 概述
Spring Security是一个功能强大且高度可定制的身份验证和访问控制框架。它实际上是保护基于spring的应用程序的标准,也是一个专注于向Java应用程序提供身份验证和授权的框架。
所需依赖
在maven pom文件中引入所需依赖
 <dependency>
            <groupId>org.springframework.boot</groupId>
            <artifactId>spring-boot-starter-security</artifactId>
 </dependency>

 <dependency>
            <groupId>org.springframework.boot</groupId>
            <artifactId>spring-boot-starter-thymeleaf</artifactId>
 </dependency>
html页面
1 Index页面
路径:src/main/resources/templates/index.html
<!DOCTYPE html>
<html lang="en" xmlns="http://www.w3.org/1999/xhtml" xmlns:th="http://www.thymeleaf.org">
<head>
    <meta charset="UTF-8">
    <title>Spring Security Index</title>
</head>
<body>
    <h1>Index Page</h1>
    <a th:href="@{/hello}">点击前往hello页面</a>
</body>
</html>
【注意】: 使用thymeleaf时需要在标签后面加入xmlns=”http://www.w3.org/1999/xhtml” xmlns:th=”http://www.thymeleaf.org” 属性,才能被编译器解析为thymeleaf模板
2 Hello页面
路径:src/main/resources/templates/hello.html
<!DOCTYPE html>
<html lang="en" xmlns="http://www.w3.org/1999/xhtml" xmlns:th="http://www.thymeleaf.org">
<head>
    <meta charset="UTF-8">
    <title>Hello</title>
</head>
<body>
<h1 th:inline="text">Hello [[${#httpServletRequest.remoteUser}]]</h1>
<form th:action="@{/logout}" method="post">
    <input type="submit" value="退出登录" />
</form>
</body>
</html>
从上面index.html可以看到包含了一个”/hello”连接点击跳转到hello.html页面的简单流程
- 我们在hello.html页面中使用了HttpServletRequest#getRemoteUser()的thymeleaf集成来显示用户名。
- 页面中退出登录表单会将请求提交到”/logout”,成功注销后程序会重定向到”/login?logout”。
3 创建登录页面(认证时需要用到)
路径:src/main/resources/templates/login.html
<!DOCTYPE html>
<html lang="en" xmlns="http://www.w3.org/1999/xhtml" xmlns:th="http://www.thymeleaf.org">
<head>
<meta charset="UTF-8">
<title>登录页面</title>
</head>
<body>
<h1>登录页面</h1>
<div th:if="${param.error}">
用户名或密码不正确
</div>
<div th:if="${param.logout}">
你已经退出登录
</div>
<form th:action="@{/login}" method="post">
<div><label> 用户名: <input type="text" name="username"/> </label></div>
<div><label> 密 码: <input type="password" name="password"/> </label></div>
<div>
<input type="submit" value="登录"/>
<a th:href="@{/sign}">注册</a>
</div>
</form>
</body>
</html>
【说明】:
- 该登录页面会将用户名和密码以表单形式提交到”/login”。
- 在Spring Security提供了一个拦截请求并验证的过滤器,在用户未通过认证的情况下会重定向到”/login?error”,并且显示相应的错误信息。注销成功后,Spring Security会将地址重定向到”/login?logout”,我们即可在页面中看到相应的登出信息
4 新增register.html注册页面
<html xmlns:th="http://www.thymeleaf.org">
<head>
    <meta charset="utf-8">
    <meta name="viewport" content="width=device-width, initial-scale=1">
    <title>注册</title>
</head>
<body>
<div class="panel-body">
    <h1>注册页面</h1>
    <form th:action="@{/register}" method="post">
        <div>
            账号: <input type="text" name="userName" id="username" placeholder="账号">
        </div>
        <div>
            密码: <input type="password" class="form-control" name="userPassword" id="password" placeholder="密码">
        </div>
        <br>
        <div th:if="${param.error}">
            <p>注册失败,账号已存在!</p>
        </div>
        <div th:if="${param.success}">
            <p>注册成功,可以登录了!</p>
        </div>
        <div>
            <button type="submit" class="btn btn-primary btn-block">注册</button>
            <a href="/login">返回登录页面</a>
        </div>
    </form>
</div>

</body>

</html>
5 新增user.html(用于登录后跳转的页面)
路径:src/main/resources/templates/user/user.html
<html xmlns:th="http://www.thymeleaf.org">
<head>
    <meta charset="utf-8">
    <meta name="viewport" content="width=device-width, initial-scale=1">
    <title>用户界面</title>
</head>

<body>

<div class="container" style="margin-top: 60px">

    <div style="text-align: center; margin-top: 10%">
        <h1 th:inline="text">Hello [[${#httpServletRequest.remoteUser}]]</h1>
        <form th:action="@{/logout}" method="post">
            <button style="margin-top: 20px">退出登录</button>
        </form>
    </div>

</div>
</body>
</html>
数据库设置
在sqllite中创建user_info表,并使用mybatis-gennerator生成文件。上两篇中有介绍。添加crud操作。
DROP TABLE IF EXISTS `user_info`;
CREATE TABLE `user_info`  (
   id INTEGER NOT NULL PRIMARY KEY AUTOINCREMENT,
   user_uuid TEXT,
   user_name TEXT,
   real_name TEXT,
  `user_password` TEXT,
  `user_roles`TEXT,
   	is_valid INTEGER DEFAULT 1 NOT NULL,
	created_time TIMESTAMP default (datetime('now', 'localtime')),
	modified_time TIMESTAMP default (datetime('now', 'localtime'))
);
CREATE TRIGGER user_info_update  after update on user_info
BEGIN
	update user_info set modified_time =datetime('now', 'localtime') where id=old.id;
END

commit ();
@Service
public class UserInfoService {

    /**
     * 获取后的Roles必须有ROLE_前缀,否则会抛Access is denied无权限异常
     */
    public static final String USER = "ROLE_USER";

    @Autowired
    private UserInfoMapper userInfoMapper;

    /**
     * 新增用户
     *
     * @param userInfo
     * @return
     */
    public boolean insert(UserInfo userInfo) {
        UserInfo userInfo1 = userInfoMapper.selectByUserName(userInfo.getUserName());
        if (userInfo1 != null){
            return false;
        }
        // 加密保存密码到数据库
        userInfo.setUserRoles(USER);
        userInfo.setUserPassword(new BCryptPasswordEncoder().encode(userInfo.getUserPassword()));
        int result = userInfoMapper.insert(userInfo);
        return result == 1;
    }

    /**
     * 查询用户
     * @param username
     * @return
     */
    public UserInfo selectUserInfo(String username) {
        return userInfoMapper.selectByUserName(username);
    }

}
创建控制层(UserInfoCtrl.java)
@RestController
@RequestMapping(value = "/", name = "注册用户")
public class UserInfoCtrl{

    @Autowired
    private UserInfoService userInfoService;

    @PostMapping("/register")
    public void doRegister(UserInfo userInfo, HttpServletResponse response) throws IOException {
        boolean insert = userInfoService.insert(userInfo);
        if (insert) {
            response.sendRedirect("sign?success");
        } else {
            response.sendRedirect("sign?error");
        }
    }
}
【说明】:
pring MVC项目中页面重定向一般使用return “redirect:/other/controller/”;即可。
而Spring Boot当我们使用了@RestController注解,上述写法只能返回字符串,解决方法就是使用HttpServletResponse,response。sendRedirect(“/**”)
配置Spring Security获取数据库数据进行校验
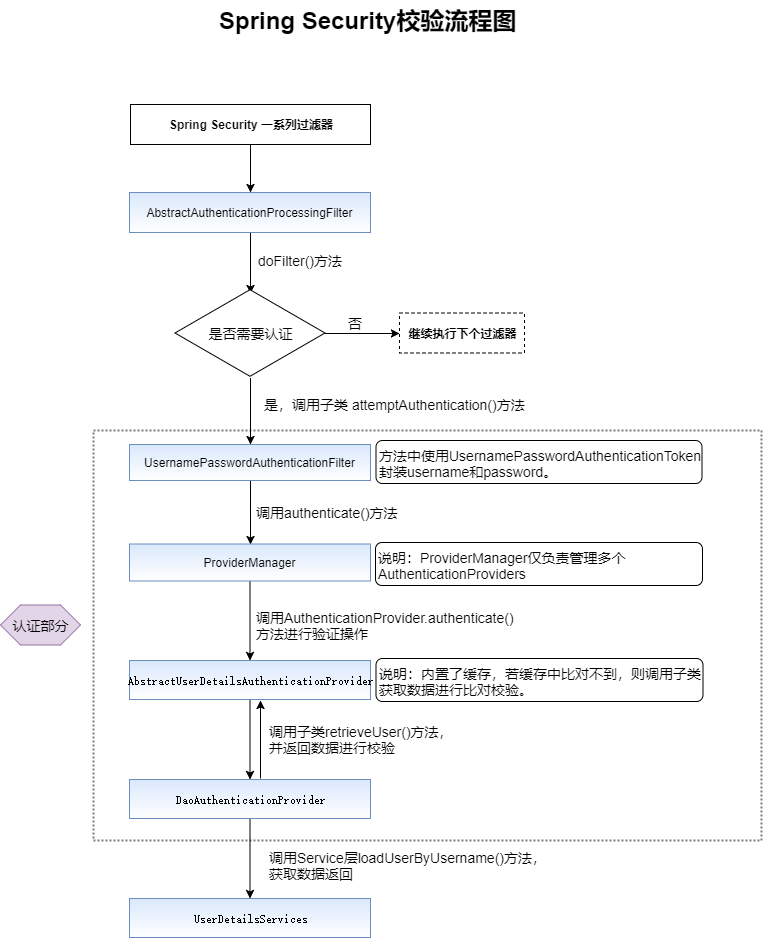
【说明】: 从流程图中我们可以得到,Spring Security最终使用UserDetailsService.loadUserByUsername()方法连接数据库获取数据并返回给校验类进行校验,因此我们需要在项目中实现该接口。
创建UserDetailsServiceNew.java类并实现UsesrDetailsService
@Service
public class UserDetailsServiceNew implements UserDetailsService{
    @Autowired
    private UserInfoService userInfoService;

    @Override
    public UserDetails loadUserByUsername(String userName) throws UsernameNotFoundException {
        UserInfo userInfo = userInfoService.selectUserInfo(userName);
        if (userInfo == null) {
            throw new UsernameNotFoundException("用户不存在"); // 若不存在抛出用户不存在异常
        }
        // 权限字符串转化
        List<SimpleGrantedAuthority> simpleGrantedAuthorities = new ArrayList<>();
        String[] roles = userInfo.getUserRoles().split(",");// 获取后的Roles必须有ROLE_前缀,否则会抛Access is denied无权限异常
        for (String role : roles) {
            simpleGrantedAuthorities.add(new SimpleGrantedAuthority(role));
        }
        // 交给security进行验证并返回
        return new User(userInfo.getUserName(), userInfo.getUserPassword(), simpleGrantedAuthorities);
    }
}
添加WebSecurityConfig.java配置
@Configuration
@EnableWebSecurity
public class WebSecurityConfig extends WebSecurityConfigurerAdapter {
    @Autowired
    private UserDetailsServiceNew userDetailsServiceNew;

    @Override
    protected void configure(HttpSecurity http) throws Exception {
        http.authorizeRequests()
                .antMatchers("/", "/index").permitAll() // permitAll被允许访问
                .antMatchers("/user/**").hasRole("USER")// 指定所有user页面需要USER角色才能访问
                .and()
                .formLogin().loginPage("/login").defaultSuccessUrl("/user")
                .and()
                .logout().logoutUrl("/logout").logoutSuccessUrl("/login")
                .and().csrf().disable();
    }

    @Override
    protected void configure(AuthenticationManagerBuilder auth) throws Exception {
//        auth.inMemoryAuthentication() // 在内存中进行身份验证
//                .passwordEncoder(new BCryptPasswordEncoder())
//                .withUser("user")
//                .password(new BCryptPasswordEncoder().encode("123456"))
//                .roles("USER");

        // 将内存验证改为获取数据库,并使用了密码加密
        auth.userDetailsService(userDetailsServiceNew).passwordEncoder(new BCryptPasswordEncoder());
    }
}
【说明】:
-
WebSecurityConfig类使用了@EnableWebSecurity注解,以启用Spring Security的Web安全支持。
-
configure(HttpSecurity)方法自定义有哪些url需要被认证,哪些不需要。当用户登录后将会被重定向请求到需要身份认证的页面(iser.html),否则在用户未登录的情况下将会跳转到登录页面
-
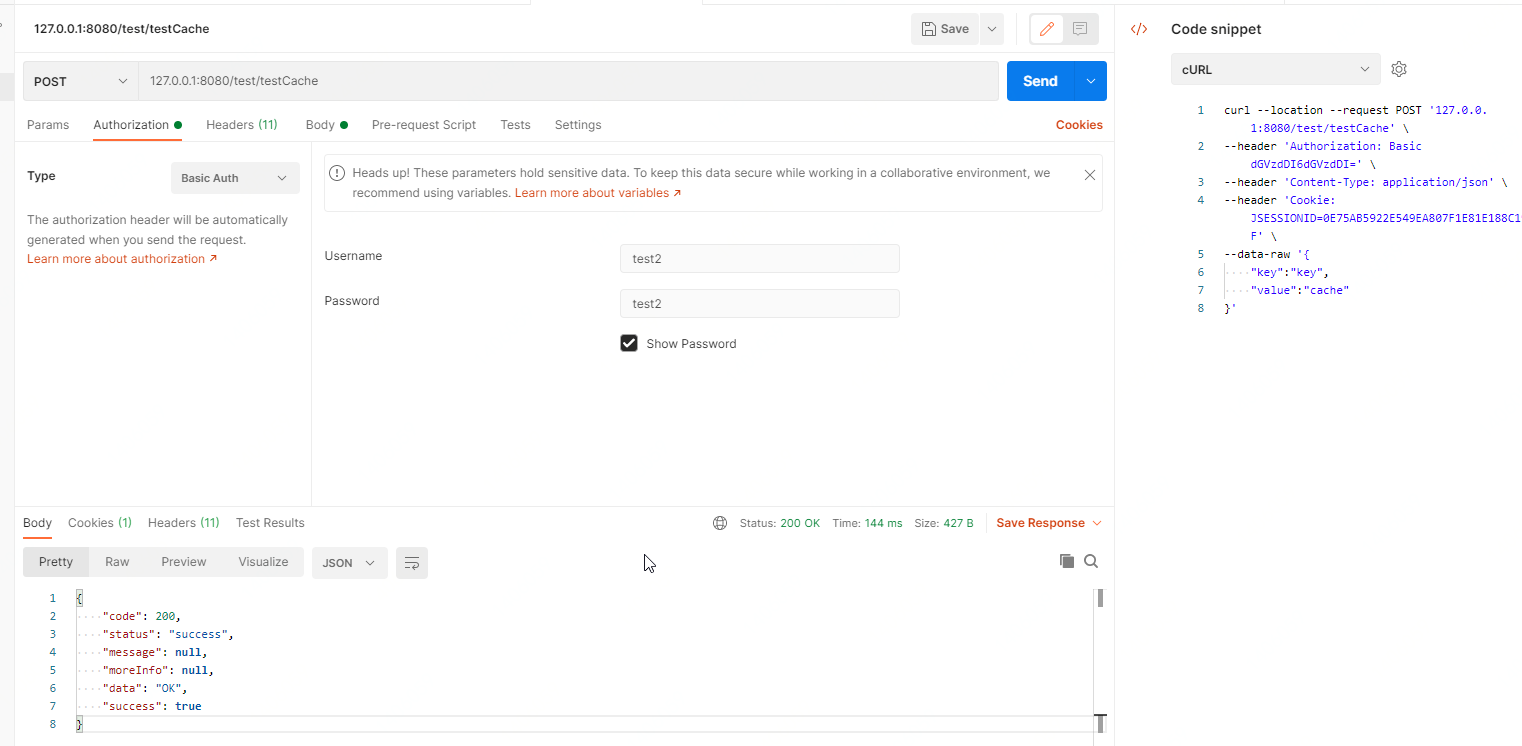
Spring Security会对POST、PUT、PATCH等数据提交类的请求进行CSRF验证(防止跨站请求伪造攻击),Spring Security要求这些请求必须携带CSRFToken,但是目前Postman并不会利用Authorization页签中填上的Basic Auth相关信息生成CSRFToken。你得用自己的登录接口来生成,并将生成的CSRFToken添加到Postman后续的各个测试请求的Headers中(X-CSRFToken)。
既然知道了原因,我们为了测试方便,我就不使用登录接口拿CSRFToken,而是暂时将Spring Security的CSRF验证关掉即可。详见下面用postman测试接口。
配置Spring MVC视图控制器
由于Web应用程序基于Spring MVC。 因此,需要配置视图控制器来暴露这些模板。
@Configuration
public class MvcConfig implements WebMvcConfigurer {

    /**
     * @param registry
     */
    @Override
    public void addViewControllers(ViewControllerRegistry registry) {
        registry.addViewController("/").setViewName("index");
        registry.addViewController("/index").setViewName("index");
        registry.addViewController("/hello").setViewName("hello");
        registry.addViewController("/login").setViewName("login");
        // 新增注册页面
        registry.addViewController("/sign").setViewName("register");
        registry.addViewController("/user").setViewName("user/user");
    }
}
测试页面
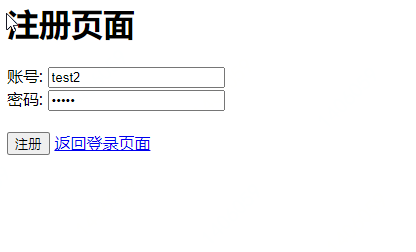
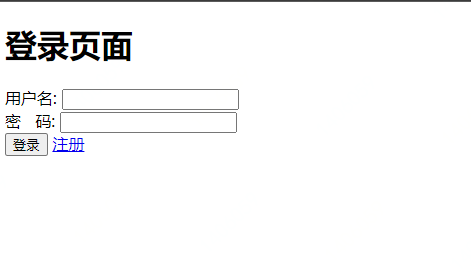
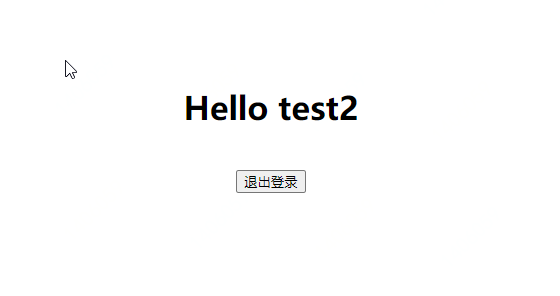
postman 测试接口
附录:HttpSecurity类的常用方法
| 方法 | 说明 |
|---|---|
| openidLogin() | 基于OpenId验证 |
| headers() | 将安全头添加到响应 |
| cors() | 跨域配置 |
| sessionManagement() | session会话管理 |
| portMapper() | 配置一个PortMapper(HttpSecurity#(getSharedObject(class))),供SecurityConfigurer对象使用 PortMapper 从 HTTP 重定向到 HTTPS 或者从 HTTPS 重定向到 HTTP。默认情况下,Spring Security使用一个PortMapperImpl映射 HTTP 端口8080到 HTTPS 端口8443,HTTP 端口80到 HTTPS 端口443 |
| jee() | 配置容器预认证,默认为Servlet容器进行管理 |
| x509() | 配置x509认证 |
| rememberMe() | 配置“记住我”的验证 |
| authorizeRequests() | 允许HttpServletRequest限制访问 |
| requestCache() | 允许配置请求缓存 |
| exceptionHandling() | 允许配置错误处理 |
| logout() | 退出登录。访问URL”/ logout”,使HTTP Session无效来清除用户,清除已配置的任何#rememberMe()身份验证,清除SecurityContextHolder,然后重定向到”/login?logout” |
| anonymous() | 允许配置匿名用户访问。默认情况下,匿名用户将使用org.springframework.security.authentication.AnonymousAuthenticationToken表示,并包含角色 “ROLE_ANONYMOUS” |
| formLogin() | 指定用于表单身份验证。 |
| oauth2Login() | 用于OAuth 2.0 或OpenID的身份验证 |
| requiresChannel() | 配置通道安全。 |
| httpBasic() | 配置Http Basic验证 |
| addFilterAt() | 在指定的Filter类位置添加过滤器 |
参考资料
1、CSRF是什么 CSRF(Cross Site Request Forgery),中文是跨站点请求伪造。CSRF攻击者在用户已经登录目标网站之后,诱使用户访问一个攻击页面,利用目标网站对用户的信任,以用户身份在攻击页面对目标网站发起伪造用户操作的请求,达到攻击目的。
2、CSRF攻击的本质原因 CSRF攻击是源于Web的隐式身份验证机制!Web的身份验证机制虽然可以保证一个请求是来自于某个用户的浏览器,但却无法保证该请求是用户批准发送的。CSRF攻击的一般是由服务端解决。
3、CSRF工具的防御手段 尽量使用POST,限制GET GET接口太容易被拿来做CSRF攻击,看第一个示例就知道,只要构造一个img标签,而img标签又是不能过滤的数据。接口最好限制为POST使用,GET则无效,降低攻击风险。 当然POST并不是万无一失,攻击者只要构造一个form就可以,但需要在第三方页面做,这样就增加暴露的可能性。 浏览器Cookie策略 IE6、7、8、Safari会默认拦截第三方本地Cookie(Third-party Cookie)的发送。但是Firefox2、3、Opera、Chrome、Android等不会拦截,所以通过浏览器Cookie策略来防御CSRF攻击不靠谱,只能说是降低了风险。 PS:Cookie分为两种,Session Cookie(在浏览器关闭后,就会失效,保存到内存里),Third-party Cookie(即只有到了Exprie时间后才会失效的Cookie,这种Cookie会保存到本地)。 加验证码 验证码,强制用户必须与应用进行交互,才能完成最终请求。在通常情况下,验证码能很好遏制CSRF攻击。但是出于用户体验考虑,网站不能给所有的操作都加上验证码。因此验证码只能作为一种辅助手段,不能作为主要解决方案。 Referer Check Referer Check在Web最常见的应用就是“防止图片盗链”。同理,Referer Check也可以被用于检查请求是否来自合法的“源”(Referer值是否是指定页面,或者网站的域),如果都不是,那么就极可能是CSRF攻击。 但是因为服务器并不是什么时候都能取到Referer,所以也无法作为CSRF防御的主要手段。但是用Referer Check来监控CSRF攻击的发生,倒是一种可行的方法。 Anti CSRF Token 现在业界对CSRF的防御,一致的做法是使用一个Token(Anti CSRF Token)。 例子: *用户访问某个表单页面。 *服务端生成一个Token,放在用户的Session中,或者浏览器的Cookie中。 *在页面表单附带上Token参数。 *用户提交请求后, 服务端验证表单中的Token是否与用户Session(或Cookies)中的Token一致,一致为合法请求,不是则非法请求。 这个Token的值必须是随机的,不可预测的。由于Token的存在,攻击者无法再构造一个带有合法Token的请求实施CSRF攻击。另外使用Token时应注意Token的保密性,尽量把敏感操作由GET改为POST,以form或AJAX形式提交,避免Token泄露。
留下评论